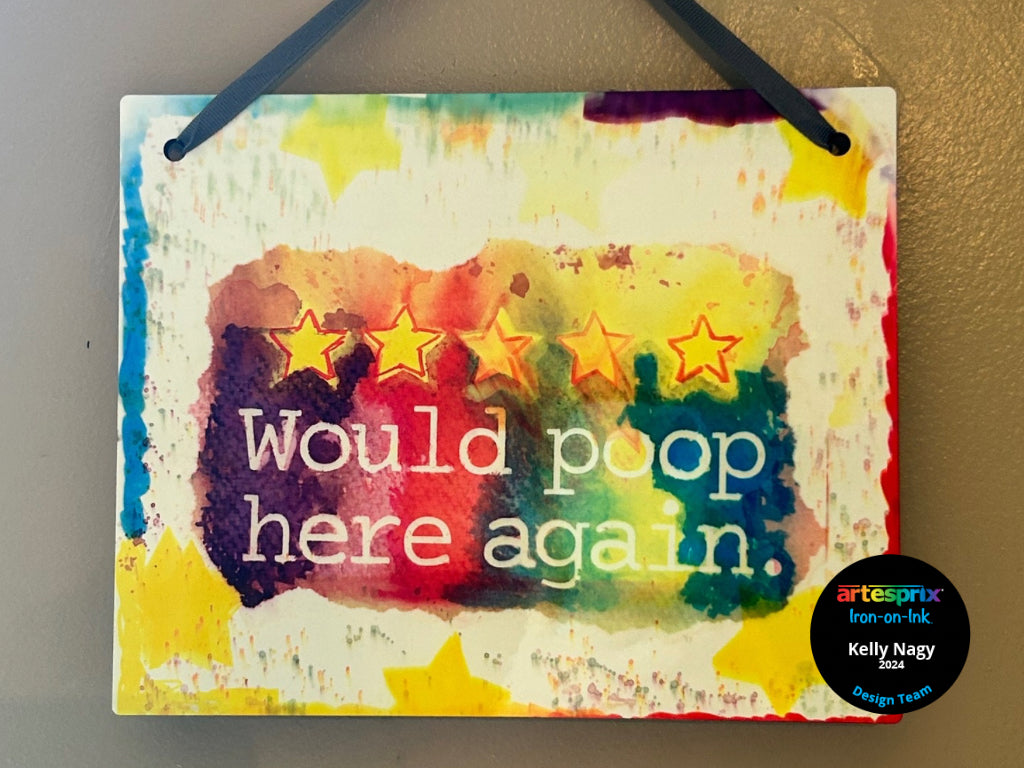
Hey crafty friends! Kelly Nagy here, bursting with excitement to share my latest project featuring Artesprix’s Iron-on-Ink! This month’s Blank of the Month (BOTM) is the Decorative Sign. As a grandparent anticipating the potty-training journey with this little one, I noticed that the space behind these little “potties” is often overlooked when it comes to décor. Inspired by this observation, I decided to put a creative twist on things – imagine a toddler’s “YELP review” of their potty experience! Join me in personalizing a colorful and joyful potty training adventure for our little ones!
**This post may contain affiliate links. That means that I may receive compensation if you purchase through the links I have provided. The price you pay for the product or service is not higher, but I may get compensated.**
What is Artesprix Iron-on-Ink?
Artesprix Iron-on-Ink reimagines a previous commercial process, now empowering home crafters to create stunning customized projects limited only by their imagination. The versatile ink, available in a variety of forms, like markers, ink pads, ink refills and acrylic paints, with the assistance of a heat source such as a heat press, handheld press or household iron. The heat and pressure turn the solids into a gas, without ever becoming a liquid. It’s pure magic and allows you to make vibrant prints on a variety of blanks (sub-straights), offering vibrant and long-lasting results. Unleash your creativity with sublimation magic and bring your designs to life in a whole new way.
Supplies:
Adhesive Vinyl
Preferred Cutting Machine
Pencil
Mixed Media
Acetate Film or Non Porous Surface
Distress Water Sprayer
Step-by-Step Tutorial:
Step 1: Trace the Decorative Sign on mixed media/card stock/or watercolor paper with a pencil.

Pro Tip: Place Sublimation Markers tip down in a cup to allow the ink to flow to the tip of the marker.
Step 2: Since we are looking to achieve a colorful, messy, childlike sign, to create the text we are going to use Cricut Smart Vinyl to mask the mixed media paper to create the text for the sign. Place the Cricut Smart Vinyl in your Cricut Joy X-tra or preferred cutting machine.

Step 3: In Cricut Design Space, create and size design appropriate and select the mirror text option that makes mirroring your letters a breeze. I wanted my sign to have five stars on the top, just like a YELP review. I then mirrored the words “Would poop here again.” Send it to cut/Make it!

Step 4: Weed and apply cut text SVG to mixed media paper within the template created in Step 1.
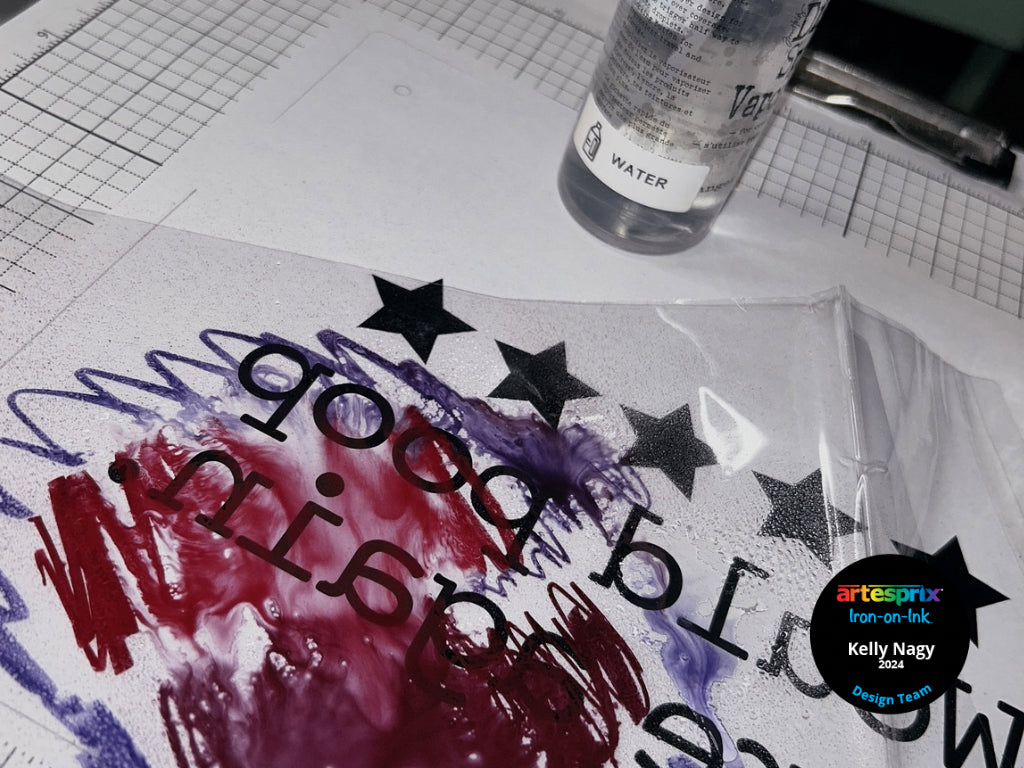
Step 5: Scribble on a piece of acetate or Ziploc bags with Artesprix Sublimation Markers. Use a Distress Water Sprayer to add some water to create movement. Press into the mixed media paper where desired to add additional dimensions to your transfer. Set aside.

Step 6: Color around vinyl with Sublimation Chisel tip Markers. There are 30 colors to choose from! Spritz with water. Then add more color by pressing in the color created in Step 5. Remove the vinyl inside the stars if desired.

Step 7: On the same paper, or a new piece like me, create a border if desired, or repeat Step 5 to add additional color where desired.

Step 8: Secure finished transfer to white side of sign with Heat Tape.

Pro Tip #2: This sublimation blank is thick so it is important to be generous with your Heat Tape.
Step 9: I am using a hand held Craft Press along with the Artesprix Protective Project Mat. Pre-heat your Heat Source to 400℉ and set to 105 seconds.
Step 10: Place a piece of Protective Paper on top of the Project Mat, then add the secured project with the design on top face-down, lastly add an additional piece of Protective Paper on top. Place Craft Press on top, start the timer, add firm pressure and keep very still to prevent ghosting.
Step 11: Do a “peek test” to ensure the color has transferred. Without removing any tape, lift a piece of the paper to ensure your transfer is bright and vivid. If not, you can simply re-apply and press again, and repeat this process until you are satisfied with the outcome.
Step 12: My peek test was perfect on the first press, so I can remove the paper to reveal my design. I learned textures transfer as well and I love the results.

Pro Tip #3: Additionally, the text is right on theme with it being not "clean cut". If you're looking for more crisp lines, consider using the Artesprix Heat Resistant Transfer Mask.

Step 13: (Optional): I cut out some stars and colored them up and taped them face down with heat tape, put the sign in the sublimation sandwich and pressed again.

Step 14: Once you have your sign, all that is left is to use the ribbon that comes with the sign, put through the two holes and secure in the back.
For now, we are enjoying this on our bathroom wall. However, eventually it will be making its way to my grandson’s home. I hope you enjoyed this cheeky Iron-on-Ink project. This Decorative Sign is great for anytime of year so grab one for yourself before July is over. Don’t forget to visit the Artesprix Facebook Group where Makers are always sharing inspirational projects.
Stay crafty!
Kelly Nagy
**This post may contain affiliate links. That means that I may receive compensation if you purchase through the links I have provided. The price you pay for the product or service is not higher, but I may get compensated.**
Comments