Artesprix Grungy Rainbow Necktie
Artesprix Design Teamgel press, Ink Pads
Products in this post


Hello! I am Alison Heikkila and I have a project that uses Artesprix’s Blank of the Month to share with you today. The Blank is a necktie, and I knew right away that I wanted to fill it with color. I spoke with my husband about what he would like in a tie, and ultimately he wanted a full rainbow of color…but I decided to add some grunge to it to make it more unique. Artesprix’s line of Iron-on-Ink makes it so easy to create any type of look you want.

What is Artesprix Iron-on-Ink?
Artesprix Sublimation Markers, Ink, and Paint are specially formulated to allow you to use basic copy paper to: color, stamp, stencil, and mono-print anything you wish and turn it into a heat-transferable design. These designs are then applied to a polyester fabric or polyester coated substrate with heat and pressure. You can use a heat press or a home iron! These designs, through this process of sublimation, will become permanent on your substrates.

Supplies:
Artesprix Ink Pads
Protective Paper
Heat Tape
Acrylic Blocks or MISTI stamping tool
Gel Press (I used the 8x10 Plate)
Stampendous: Mixed Mesh Cling Stamp
Isopropyl Alcohol 91% (in a spray bottle)
Heat Source: Home Iron or Heat Press
Pencil
Copy Paper
Bubble Wrap
Step-by-Step Tutorial:
Step 1: Apply Artesprix’s Ink Pads directly to the Gel Press Plate. I went for rainbow order. You do not need a lot of ink to get a good mono-print.

Step 2: Spritz the inked up Gel Press Plate with Isopropyl Alcohol. This helps blend and move the colors. Use your brayer as much or as little as you like to further blend the colors.
Pro Tip: You can adhere acrylic blocks to the back of your Gel Press Plate so that you can pick it up to swirl the colors around when you apply the isopropyl alcohol.

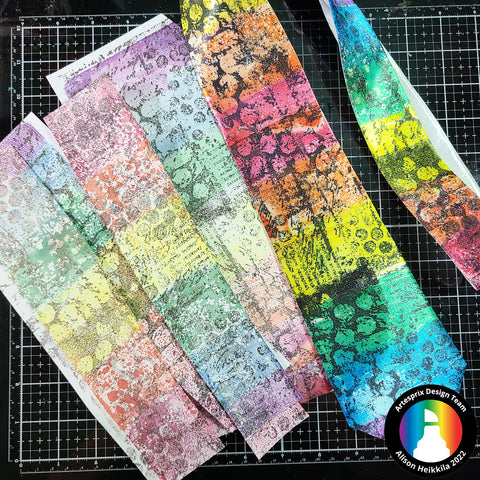
Step 3: Lay your paper on the plate and rub the paper. Ensure your paper is in contact with the whole plate, then pull the paper to see your print. You can see in the photo that I made several prints. We have a lot of area to cover on the tie, so having multiple prints is helpful. The print in the lower right corner was made with the excess ink on my brayer. I will use that print on another project at some point.
Pro Tip #2: If you have any extra designs you can always save them for another project for a sublimation blank in the future.

Step 4: Stamp the Mixed Mesh (or other background stamp) onto your dry, completed mono-prints with the Black Ink. Fill in empty areas by inking up bubble wrap and stamping it with Black Ink too.
Step 5: Lay the Necktie on to your finished design and outline it with pencil. Do not position your Necktie on the center of your paper, this way you can get at least two strips out of the paper.
Step 6: Cut the paper in accordance with your traced space. You should get at least 2 stips that can sublimate a good portion of the tie. In the end, I wound up needing 2 full sized monoprints cut down to fill the tie with my design.

Step 7: Take the first strip and lay the necktie facedown on to your design, following the pencil lines you added before. Secure the necktie with Heat Tape.

Step 8: It’s time for the "Sublimation Sandwich". Add a layer of Protective Siliconized Paper to the top and bottom of your Blank. Your sandwich will be: Protective Paper, Colored Design, Blank, Protective Paper. The Protective Paper prevents any inkaccidentally transferring to either side of your heat press or to your home iron.
Step 9: Sublimate the first design for 60 seconds at 400℉.

Step 10: Time for the "Peek Test"! Carefully lift a small portion of your art off of the Necktie to ensure your transfer was successful. If you need to re-press your piece, you can do it since you haven’t moved the design out of place.

Here is what the first transfer looks like. I think it came out great!
Step 11: Repeat Steps 7-10 for the rest of the Necktie until you complete the entire piece.

My Necktie is done and it looks awesome! And check out how handsome my husband looks while wearing it. I love that we can make truly wearable art with this necktie and Artesprix’s Iron-on-Ink!

How would you like to get more ideas on using Artesprix’s Sublimation Ink Pads, Markers, and Paint? There’s a Facebook Group that’s just for fans of Artesprix! You can click HERE to join. Also, don't forget to visit the Artesprix store to see all of the available blanks and bundles, so you can get started with sublimation.
Thanks so much for stopping by. Have an inspiring day!
Alison Heikkila
**This post may contain affiliate links. That means that I may receive compensation if you purchase through the links I have provided. The price you pay for the product or service is not higher, but I may get compensated.**


