Curly Waves Wine Bag with Iron-on-Ink
Artesprix Design TeamInk Pads, Wine Bag
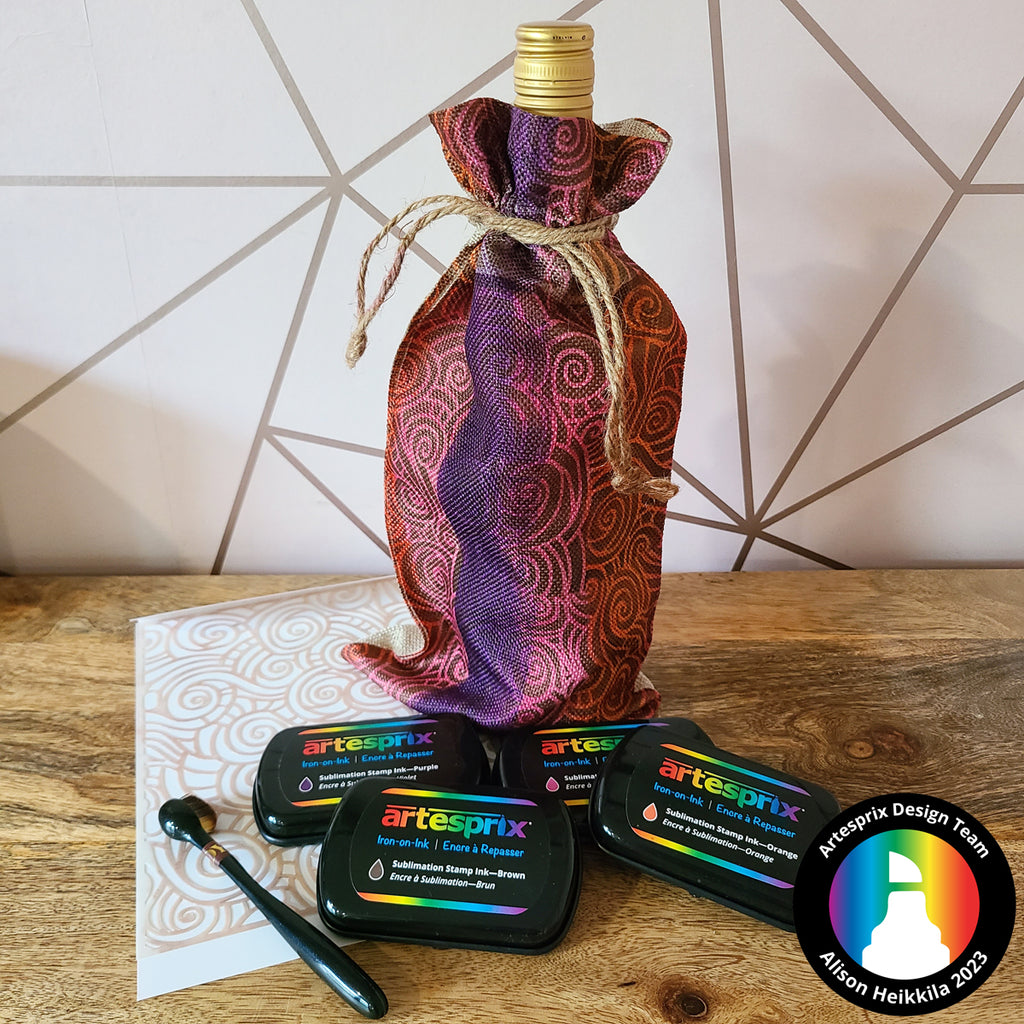
Products in this post


Hello! I’m Alison Heikkila and today we’re going to decorate a Wine Bag with a fun stencil from Pink & Main and our Artesprix Sublimation Stamp Pads. This is a great beginner Iron-on-Ink project, and you can customize the colors and stencil however you like! These Wine Bags are made of a soft, shiny, burlap material that adds to the finished transfer. They are also double sided, perfect for adding a personalized message, name, or holiday wishes!
**This post may contain affiliate links. That means that I may receive compensation if you purchase through the links I have provided. The price you pay for the product or service is not higher, but I may get compensated.**

What is Sublimation Iron-on-Ink?
Artesprix Sublimation Markers, Ink, and Paint are specially formulated to allow you to use basic copy paper to: color, stamp, stencil, and monoprint anything you wish and turn it into a heat-transferable design. These designs are then applied to a polyester or polyester coated substrate with heat and pressure. You can use a heat press or a home iron! These designs, through this process of sublimation, will become permanent on your substrates.

Supplies:
Wine Bag
Sublimation Stamp Pads: Pink, Purple, Orange, and Brown
Protective Paper
Heat Tape
Pink & Main: Curly Waves Stencil
Copy Paper
Blending Brush
Heat Press or Craft Press
Step-by-Step Tutorial:
Step 1: Press the Pink Stamp Pad directly on to your copy paper, working in a vertical line up the page.

Step 2: Work your way across the page, creating vertical lines with your Stamp Pad colors. Don’t worry if they overlap, or even if your lines aren’t perfectly straight. I think this technique looks even better when the lines are imperfect.

Step 3: Ink up an additional piece of paper so that our finished design will go up the entire Wine Bag.

Step 4: Tape the stencil to the inked paper. Use a blending brush to apply the Brown ink through the stencil.
Pro Tip: These stencils have holes for binders for storage. I love that! But I didn’t want it in my design, so I made sure to have that part go past my inked paper, as seen in the photo above.

I taped my stencil only on the top, so that I can lift it easily to make sure everything is inked up well. This looks great, so we can move on to the next step.
Step 5: Move the stencil up and re-tape to ink up the next section. Repeat until all of your inked papers are done.

Step 6: Use Heat Tape to secure the Wine Bag to the finished design. My heat source is smaller than my blank so we have to transfer in two sections. I am only transferring the full piece for now. We can sublimate the smaller piece later. The Wine Bag can be sublimated on both sides.

Step 7: It’s time to make the "Sublimation Sandwich". This sandwich not only ensures a great transfer of your design, but it will protect your work surfaces as well. Your sandwich will be: Protective Paper, Design (face down), Wine Bag, Protective Paper.
Step 8: Press the "Sublimation Sandwich" for 45 seconds at 400℉.

Step 9: It’s time for one of my favorite steps…the "Peek Test"! Carefully lift one of the edges of the design to see if it sublimated well. The colors are so vibrant! I’m happy with these results, so we can remove the paper and sublimate our other piece.

Step 10: Attach the second part of the design to the top of the Wine Bag and repeat the steps above.

Pro Tip #2: Be sure to cover any exposed sublimated areas with Protective Paper during your transfers.
Here is the completed Wine Bag! I really like that the lines are a bit ragged from the way we applied the ink to the paper. The Wine Bag looks even better with a bottle of wine in it!
This makes such a great gift in addition to a bottle of wine or a non-alcoholic beverage. You can personalize it easily to suit your needs, style of the recipient, or the occasion. And don’t forget, you can sublimate on both sides of the Wine Bag. How would you like to get more ideas on using Artesprix’s Sublimation Iron-on-Ink? There’s a Facebook Group that’s just for fans of Artesprix! You can click HERE to join. Also, don't forget to visit the Artesprix store to see all of the available blanks and bundles, so you can get started with sublimation.
Thanks so much for stopping by. Have an inspiring day!
Alison Heikkila
**This post may contain affiliate links. That means that I may receive compensation if you purchase through the links I have provided. The price you pay for the product or service is not higher, but I may get compensated.**


1 comment
I live this technique. I’ll have to try it soon. And that stencil is so pretty.