Pocket Full of Flowers Iron-on-Ink T-Shirt
Artesprix Design TeamInk Pads, Markers, Spring Projects, T-Shirt
Products in this post


I’m Design Team Member Naomi and I am totally HOOKED on Iron-on-Ink by Artesprix! For this project, I used their sublimation t-shirt along with their patented markers to make a really cute t-shirt for my daughter. It was super simple and especially relaxing to make. Let’s take a look at how this shirt design came from visualization to reality.
**This post may contain affiliate links. That means that I may receive compensation if you purchase through the links I have provided. The price you pay for the product or service is not higher, but I may get compensated.**

What is Artesprix Iron-on-Ink?
Artesprix Iron-on-Ink is an excellent way to experience the sublimation process without having a sublimation printer. Their markers, stamp pads, and acrylic paints (my personal favorite) are made to use with regular copy paper. When transferred to a sublimation-ready blank using a heat source, you end up with a simply stunning and brilliant print. The best part it is, it's the same professional level project you would get from a sublimation printer.

Supplies:
Artesprix Iron-On-Ink Sublimation T-Shirt
Design to transfer (I used this one from Creative Fabrica)
Artesprix Iron-On-Ink Markers
Artesprix Iron-On-Ink Stamp Pads in your choice of color (optional)
Artesprix Block Alphabet Stamp Set
Acrylic Stamp Block
Cricut Bright Pad or other light source
1 sheet of letter size copy paper
Artesprix Protective Paper
Heat Tape
Heat press or Easy Press
Step-by-Step Tutorial:
Step 1: Create your design. I chose to download a pretty floral pocket design from Creative Fabrica.

Step 2: Place your printed design, printed side down, on your light source and trace with Artesprix markers.
Pro Tip: By putting your printed design face-down to trace, this ensures you are getting the original design by creating a "mirrored" transfer for sublimation.
Step 3: Use an Artesprix Block Alphabet Stamps to spell out the word “HI” on a acrylic stamp block.

Pro Tip #2: Artesprix designed their stamps to be used for sublimation you don’t have to worry about “mirroring” the text.
Step 4: Stamp the word on to the pocket part of the design.

Step 5: When you are done, tear around the outside of your drawn design. Tearing instead of cutting will help reduce hard pressing lines
Step 6: Use a lint roller to remove lint from the shirt.
Step 7: "Pre-press" your shirt for a few seconds to get rid of moisture and wrinkles.
Pro Tip #3: This is also a great opportunity to check your pressure, with fabric you want just enough pressure for a solid transfer, but not too much that "press lines" get left behind. 
Step 8: Position your design on your shirt and secure it with a few strips of heat tape.
Step 9: Let’s make our "sublimation sandwich". Place a sheet of protective paper on the bottom platen of your heat press. Put a sheet of protective paper inside of the shirt in the area where you will be adding the design. Add the t-shirt over the protective paper, and then add a final sheet of protective paper over the top. This helps protect your heat press and shirt from any accidental ink transfer.
Pro Tip #4: That might seem like a lot of protective paper, and it is, but better to be safe than sorry! Artesprix Protective Paper is siliconized and specifically designed for this, so if there is no ink residue left behind, it can be reused.
Step 10: Press your design at 370℉ for 35 seconds.
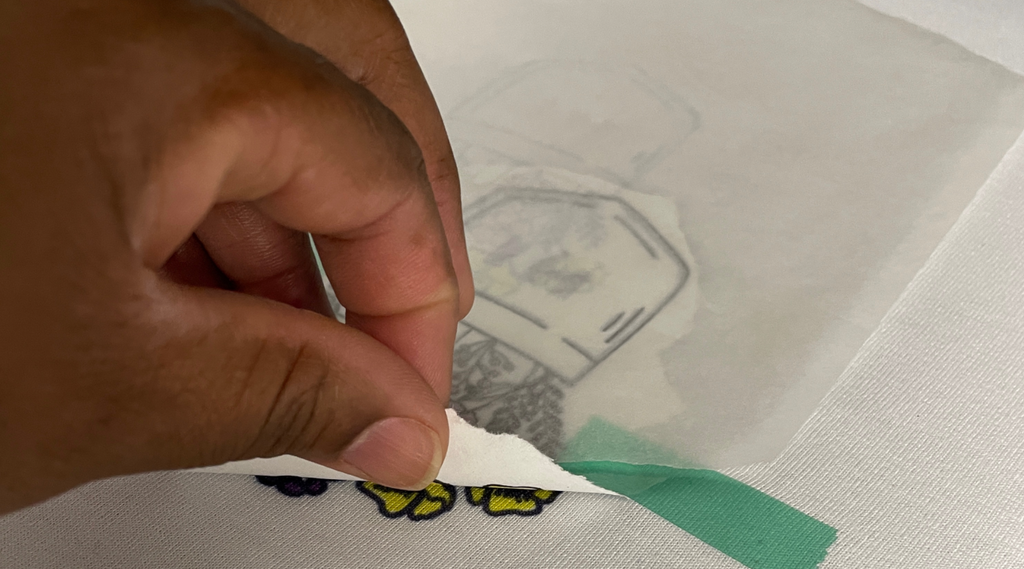
Step 11: When the time is up, do a little "peek test" by lifting a corner of the design to make sure your design transferred as you wanted. Key here is to keep all heat tape in place, in case you need to re-press.
Step 12: If your "peek test" was successful reveal the transfer! And you are done!

This project is super easy, super fun, and can be completed in minimal time. It can even be a great project for kids. And let's not forget this is lifetime permanent, this will last wash, after wash. Artesprix carries t-shirts in Adult, Youth, Toddler, and they even have Baby apparel! Not only will anyone love this design, but they will also love the soft cotton-feel fabric of the t-shirt.
Be sure to check out the Artesprix Blog for more creative ideas for your next Iron-on-Ink project. If you decide to try out this project using Iron-on-Ink Markers or Stamps, be sure to use the #Artesprix & #IrononInk or post your project to the Artesprix Facebook Group. If you want to learn more about me, visit my About Me here.
Now, go make something amazing!
Naomi Garcia
**This post may contain affiliate links. That means that I may receive compensation if you purchase through the links I have provided. The price you pay for the product or service is not higher, but I may get compensated.**


